Assignment of responsibilities
One of the scopes of the project is its context. All tasks that were done during the project were fixed at time sheets. These tasks are represented in the table 1.
Table 1 Distribution of responsibilities
| № | Task | Description | Output | Implementer |
| 1 | Ideagenerating | Discussions, researching | Ideaofourproject | All members |
| 2 | Checkideas | Is there any math models for this ideas in the Internet? Anypatents? Anyvideos? | confirmation that our idea is unique | All members |
| 3 | Organize the first meeting | find information, staging and distribution of tasks | The discussed issues | Vlad |
| 4 | Timesheetcreation | Creation time-sheets templates and insructions | Time sheets, manual for timesheets | Roma |
| 5 | Patent document creation and review | Patentcreation | Patentdocument | Kate, Dima |
| 6 | Translation | Translating of all necessary materials | Translated document | Kate |
| 7 | Searchusefullinks | Search for ideas of mathematical models, videos, patents, diagrams, etc. | The folder with helpful documents, videos | Vlad, Dima |
| 8 | Searchoftechnicalresourses | FabLabGuysdiscussion | ContactswithFabLab | Roma |
| 9 | Mathmodelcreation | Сlarification of the matter: Is our model stable or unstable in different cases | Math model | Kate, Dima |
| 10 | Simulinkmodelcreation | WorkinginSimulink | Simulimk model | Dima |
| 11 | Solidworksmodelcreating | WorkinginSolidWorks | Drawingofproject | Roma |
| 12 | Purchaseproccess | Search for necessary materials, prices for them choosing the best option | Sheet of details and expenses | Vlad |
| 13 | Projectplancreation | Working in MS Project | Project plan | Nasty |
| 14 | Project design creation | Creation of the document | The document | |
| 15 | Preparingpresentation | Presentationof BP | ppx document | Kate, Vlad |
| 16 | Organize the second meeting | discussion of results distribution of tasks definition of time frames | The discussed issues | Vlad |
| 17 | Processes with Arduino | Controller programming | programmed controller | Vlad, Dima |
| 18 | Searching for the extra details | replacement of a damaged part | Roma | |
| 19 | Control of the Assembly process | Workwiththeteam | Kate | |
| 20 | Generating ideas for the Assembly process | Construction of installation drawings, search of components | the solution found | All members |
| 21 | Assemblyprocess | Assembly process | assembled device | All members |
| 22 | Finalreport (+video) | Gatheringinformation, reporting | Final document | Kate, Dima, Vlad |
Project Implementation Plan
|
|
|
Work on the project begins with the formation of a patent; the next step is developing a business plan for the project with justification for its feasibility, other stage direct implementation of the project and presentation to the customer.
The baseline project plan and Gant’s diagram are represented at the Figures 16-17.
During the work on the project, we adhered to the plan developed at the stage of business planning.

Figure 16.Project plan(1)

Figure 17.Project plan(2)
Purchasing processes
During the creation of business plan we supposed we would have to buy all the details buy our own.According to this assumption required to purchase the components represented at the table 2.
Table 2. List of purchases
| Line number | Name | Description | Quantity | Shop’s name | Price per one (RUB) | ||
| 1 | Arduino UNO | It may connect with PC, has suitable parameters for our project, has medium price | 1 | S.Redko store | 0 | ||
| 2 | USB cable | For communication between Arduino and PC | 1 | S.Redko store | 0 | ||
| 3 | Breadboard | Generalpartsforassembling | 1 | Амперка | 290-390 | ||
| 4 | Power supply | Appropriate for particular stepper | 1 | Амперка | 500-1500 | ||
| 5 | Hook-up wires | For communication between the elements of the system | 1 | S.Redko store | 0 | ||
| 6 | Bipolar stepper motor | Stepper motors, due to their unique design, can be controlled to a high degree of accuracy without any feedback mechanisms | 1 | Амперка | 1100-1500 | ||
| 7 | Blades for stepper motor | For turning the motor into a fan | 3-5 | FabLAbPolitech | 500-1000 | ||
| 8 | Ultrasound transducer | A special sensor (the distance from the upper edge of the pipe to the soaring ball is measured in specified intervals of time) | 1 | S.Redko store | 0 | ||
| 9 | L293D chip | The L293D chip is an assembly of four H-half-bridges. This can be used to independently control two DC motors | 1 | Амперка | 290 | ||
| 10 | A ball | With a special weight and overall size | 1 | FabLAbPolitech | 200-300 | ||
| 11 | A pipe | This part will be printed on the 3d printer | 1 | FabLAbPolitech | 1000-2000 | ||
|
| Summary** | 6400 | |||||
The cost of some parts may seem overpriced. The reason is that our team decided to use only high-quality parts. In addition, some details are planned to bedeveloped in cooperation with the FabLabPolitech.
*The links to components are represented at the table 2.
**We have a price range for most of positions:
1) Pessimistic forecast of cost is 6680 RUB;
2) Optimistic forecast is 6120 RUB;
3) Average(expected) cost is 6400 RUB.
100 Euro is 6736 rubles (exchange rate from 28.10.2017), so our costs keep limit.
Table 3. Links
| Line number (in main table) | Name | Links* |
| 3 | Breadboard | http://amperka.ru/product/breadboard |
| 4 | Power supply | http://amperka.ru/product/power-bank-li-ion |
| 6 | L293D chip | http://amperka.ru/product/l293d-motor-driver |
| 9 | Bipolar stepper motor | http://amperka.ru/product/stepper-motor-nema17-42sth47-0406a |
In fact, we managed to establish cooperation with FabLab. As some of the details turned out to be quite difficult to be found in the city's online shops, we turned to representatives of the technical laboratory of the Polytechnic Institute.
|
|
|
Representatives of the FabLab were kindly allowed to use some of their details for the development of our device (with the condition of their subsequent return).
So the detail table looks like this(table 4):Table 4 actual worksheet
| Line number | Name | Description | Quantity | Shop’s name | Price per one (RUB) |
| 1 | Arduino UNO | It may connect with PC, has suitable parameters for our project, has medium price | 1 | S.Redko store | 0 |
| 2 | USB cable | For communication between Arduino and PC | 1 | S.Redko store | 0 |
| 3 | Foil-coated fiberglass | Generalpartsforassembling | - | Own resourses | 0 |
| 4 | Power supply | Appropriate for particular stepper | 1 | FabLAbPolitech | 0 |
| 5 | Hook-up wires | For communication between the elements of the system | 1 | S.Redko store | 0 |
| 6 | Impeller* | Stepper motors, due to their unique design, can be controlled to a high degree of accuracy without any feedback mechanisms | 1 | Avito | 1300 |
| 7 | Power regulator | For turning the motor into a fan | 1 | FablabFabLAbPolitech | 0 |
| 8 | Light sensor | A special sensor (the distance from the upper edge of the pipe to the soaring ball is measured in specified intervals of time) | 2 | Roboshop | 50 |
| 9 | Laser pointer | Light source | 2 | Максидом | 156 |
| 10 | A ball | With a special weight and overall size | 1 | Спортмастер | 69 |
| 11 | A pipe | This part will be printed on the 3d printer | 1 | OBI | 279 |
|
| Summary** | 2060 | |||
*Unfortunately, during the experiment the impeller(bought by us) became useless.Choosing this detail, we carefully checked its compatibility with the regulator and power source, but during the experiment we connected the impeller to the power unit without a speed regulator, so the impeller burned down.
|
|
|
So as not to spend your money on the purchase of another impeller, later we took a serviceable impeller in a FabLAbPolitech(for free with return).
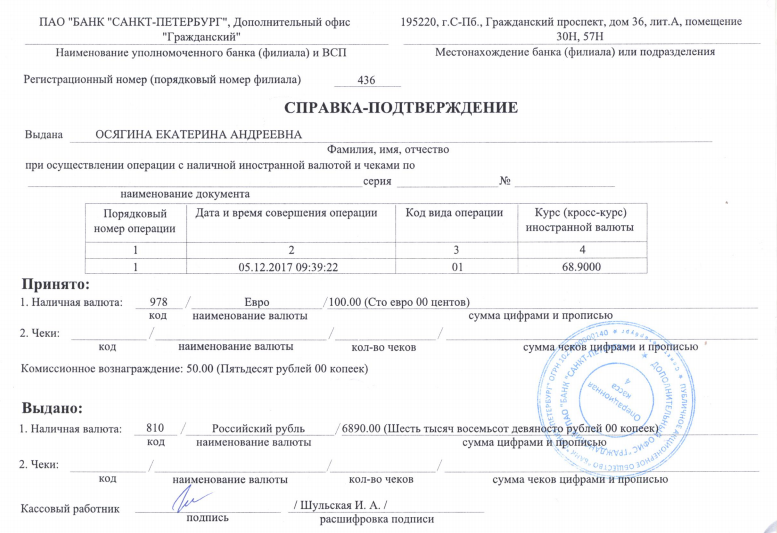
Financial report
The financial report is represented in the table 5.All invoices are represented in this Appendix.
Table 5. Cost of parts
| № | Expense item | Price, RUR | Price, EUR5 | Amount | Comments |
| 1 | Impeller | 1300 | 18,5 | 1 | |
| 2 | Light sensor | 50 | 1,4 | 2 | |
| 3 | Laser pointer | 156 | 4,45 | 2 | |
| 4 | A ball | 69 | 1 | 1 | |
| 5 | A pipe | 279 | 3,98 | 1 | |
| 6 | Foil-coated fiberglass | 0 | 0 | - | We used our own materials |
The exchange rate is 68.9 RUB per EURO (26.11.2017). Receipt from the bank is attached in the annex.
Projects risks
The key project risks are represented in the table 6
Table 6 Risks.
| № | Risk | Probability | Influence | Is it appear? | Activities for minimization |
| 1 | Currency exchange rate will increase and the budget of project will decrease | 30% | 80% | no | exchange rate monitoring |
| 2 | Unreliable suppliers (long deliveries) | 70% | 35% | no | order in advance or buying more expensive details in the city shops |
| 3 | Low quality details | 50% | 40% | no | monitoring of comments on items |
| 4 | Deterioration of parts during the experiment | 45% | 70% | yes | carefully study the characteristics of the part |
| 5 | There is no enough knowledge and skills to realise project | 30% | 90% | no | study additional literature and the involvement of consultants |
| 6 | Too high workload of teammembers in other activities (study, work, etc.) will break time scopes | 90% | 85% | no | time planning and prioritization |
Links
1. Аржаников Н.С., Садекова Г.С. Аэродинамика больших скоростей. М.: Высш. шк., 1965
2. Аржаников Н.С., Мальцев В.Н. Аэродинамика (2-е изд.) М.: Оборонгиз, 1956
3. Валландер С.В. Лекции по гидроаэромеханике. Л.: Изд. ЛГУ, 1978
4. Как программировать контроллер Ардуино
http://mozgochiny.ru/bez-rubriki/programmiruem-arduino-s-nolya/
5. Ардуино для начинающих
https://www.youtube.com/watch?v=67dWmV0Y9JE
Appendix 1.Receipts


Appendix 2. Program code
#include <Servo.h>
/*
* Скетч аэротрубы с обратной связью
* Вдефайнах эмпирически подобранные значения длины импульса посылаемого в регулятор
*/
#define STAB_FLOW 962 //"на месте"
#define TOP_FLOW 965 //вверх
#define BOT_FLOW 960 //вниз
Servomotor;
boolstart = true;
//Память под данные с датчиков
//значения с прошлого опроса
intprev_sens_top = 0;
intprev_sens_bot = 0;
//с текущего
intsens_top = 0;
intsens_bot = 0;
//для расчётов
inttemp_top = 0;
inttemp_bot = 0;
intpos = 1; //1 выше, 0 нормально, -1 ниже
voidsetup() {
//Serial.begin(9600);
//входы датчиков
pinMode(8, INPUT);
pinMode(9, INPUT);
//Запуск регулятора, менять не стоит.
motor.attach(3);
motor.writeMicroseconds(1500);
delay(700);
motor.writeMicroseconds(800);
delay(1000);
}
voidloop() {
//Запуск с выталкиванием мяча
if(start)
{
motor.writeMicroseconds(995);//обороты выталкивания на старте
//Длительность выталкивания на старте
delay(3000);
start = false;
}
/*
Serial.print("Topsensor: ");
Serial.print(digitalRead(8));
Serial.print(" Bottomsensor: ");
Serial.println(digitalRead(9));
*/
//запоминаемпредыдущиепоказания
prev_sens_top = sens_top;
prev_sens_bot = sens_bot;
//считываемтекущие
sens_top = digitalRead(8);
sens_bot = digitalRead(9);
//определениеположениямяча
if (sens_top != prev_sens_toporsens_bot != prev_sens_bot) // еслиестьизменения
{
//узнаемчто-товродехарактераизменения: 1 = мячулетедслиниилазера, 0 = ничегонепроизошло, -1 = мячналетелналазер
temp_top = prev_sens_top - sens_top;
temp_bot = prev_sens_bot - sens_bot;
//устанавливаемпозициюисходяизполученыхданных
if(temp_top == 1)
{
if(sens_bot == 1)
pos = -1;
else
pos = 1;
}
if(temp_top == -1)
{
if(sens_bot == 1) pos = 0;
else
if(pos == -1) pos = 1;
}
if(temp_bot == 1)
{
if(sens_top == 1)
pos = 1;
else
pos = -1;
}
if(temp_bot == -1)
{
if(sens_top == 1) pos = 0;
else
if(pos == 1) pos = -1;
}
}
//реагируем
if(pos == 1)
{
//Serial.println("Выше");
motor.writeMicroseconds(BOT_FLOW);
}
if(pos == 0)
{
//Serial.println("Норм");
motor.writeMicroseconds(STAB_FLOW);
}
if(pos == -1)
{
//Serial.println("Ниже");
motor.writeMicroseconds(TOP_FLOW);
}
delay(5);//200Гцчастотаопросадатчиковиреагирования
}
Appendix 3. Used software
1. MatLab + Simulink
2. Microsoft Project
3. Solid Works
4. Arduino Software
Дата добавления: 2018-02-28; просмотров: 375; Мы поможем в написании вашей работы! |

Мы поможем в написании ваших работ!